The mistake most people make is looking for one number: "how many credits is a clip?" There isn't one, because the same feature can cost very different amounts depending on two things you control — how long the clip is, and which model tier renders it. So the question isn't "what's the price," it's "what's my price, for my clip, on my plan." That sounds evasive, but it's actually empowering: once you read your own rate card, the math is simple and you stop guessing.
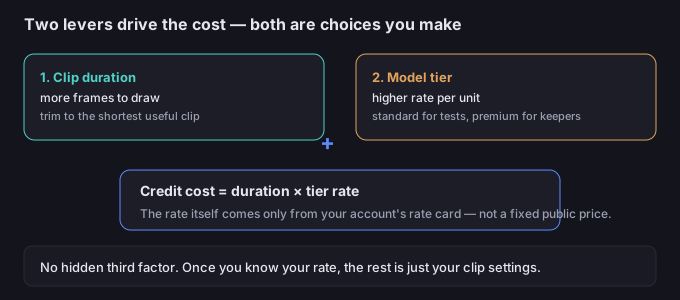
What actually drives the cost
Strip it to the two variables and the rest is noise:
| Driver | How it changes cost | What you can do |
|---|---|---|
| Clip duration | Longer clips ask the model to draw more frames, so they cost more | Trim the reference to the shortest clip that shows the motion you need |
| Model tier | Higher tiers carry a higher per-unit rate than standard ones | Use the standard tier for learning runs; reserve premium for the final keepers |
| Resolution / quality option (if offered) | Higher quality per frame can add cost on top of duration | Pick the lowest quality that still shows the motion clearly for tests |
| Number of clips, not their cleverness | Five variations cost five times one, regardless of how "smart" they are | Plan a small batch; reuse one good reference across variations |
Notice none of these is a mystery price. They are choices you make on the generation screen. The only number you cannot derive by reasoning is the rate your plan applies — and that lives in your account.
How to compute your own cost-per-clip
Open your plan's rate card (the credits-per-unit your account shows). Then the budget is just arithmetic:
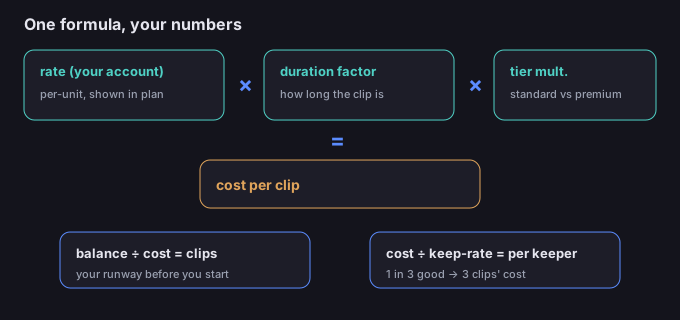
- Cost per clip = your rate per unit × the duration factor of your clip × the tier multiplier you selected.
- Clips per balance = your remaining credit balance ÷ your cost per clip.
- Cost per useful result = cost per clip ÷ your historical keep-rate (how many clips actually become usable). If 1 in 3 is good, your real cost is three clips' worth per keeper.
Plug in your own numbers — the formula is stable even though the rate changes. The point is to know, before you hit generate, roughly how many clips your balance buys and how many of those you expect to keep.
5-step budgeting workflow
- Read the rate card once. Find the credits-per-unit your plan actually charges. Rates move, so check it at the start of a project, not from memory.
- Pick the cheapest useful settings for tests. Standard tier, shortest workable duration, lowest quality that still shows the motion. Save premium for the final renders.
- Compute clips-per-balance. Divide your balance by your test cost-per-clip so you know your runway before you start.
- Spend the first clips on the highest-information test. A full-body, genuinely-moving reference on your real character image teaches more per credit than ten near-identical retries.
- Promote only after you've learned. Once a reference and settings combo works, re-render the keeper at the higher tier or quality — one premium clip, not ten.
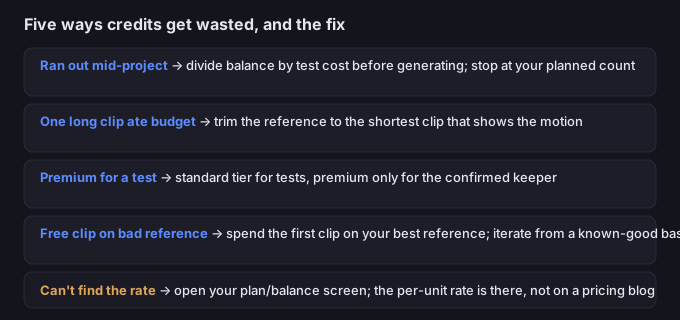
5 failure modes (and the fixes)
| Failure | Why it happens | Fix |
|---|---|---|
| Ran out mid-project | Started without computing clips-per-balance | Divide balance by test cost before generating; stop when you hit your planned count |
| One long clip ate the budget | Rendered at full duration for a test that needed three seconds | Trim the reference to the shortest clip that shows the motion |
| Paid premium for a learning run | Used the high tier before knowing the reference works | Standard tier for tests, premium only for the confirmed keeper |
| Free clip wasted on a bad reference | Tested an unproven reference instead of the strongest one | Spend the first clip on your best reference; iterate from a known-good base |
| Could not find the rate card | Looked for a fixed public price instead of the account view | Open your plan or balance screen — the per-unit rate is shown there, not on a pricing blog |
What to do when the motion is right but you're watching the balance
A low balance never changes the clip quality — only how many more you can make. So when credits run low, the move is to stop experimenting and promote what already works: take the reference and settings that produced a good result and re-render it once at the quality you wanted. That converts a learning run into a deliverable without spending on more guesses.
If you also plan to isolate the character (for compositing onto a new scene), do the background removal after you have the keeper, so the transparent subject carries cleanly into your editor. The tool on this site runs in your browser, so your video never leaves your device while you work — nothing is uploaded to a server.
Common questions
Is there a fixed credits-per-clip number I can rely on?
No single published constant. The rate depends on your plan and the duration and tier you choose, and rates change over time. The authoritative number is the one in your own account's rate card — not a figure quoted on a third-party site.
Which plan is cheapest per clip?
That shifts with promotions and tier changes, so it can't be stated as fact here. Compare the per-unit rate shown in each plan you're considering against the duration and tier you actually use; the cheapest plan on paper isn't always cheapest for your clip length.
Does a longer reference give better motion for the extra cost?
Only if the extra seconds show motion the short clip missed. A longer reference mainly adds cost, so trim to the useful part.
Do free clips count the same as paid ones?
Free allowance is a sampler, not a production budget — spend each free clip on the highest-information test, then decide whether a paid plan's rate makes sense for volume.
Are my files uploaded when I edit them later?
No. Anything you process with the tools on this page runs in your browser; we never receive your media.